Barber courses by Barte · 2WENTYTWO · Union, New Jersey
Learn the craft. Build the confidence. Become the barber.
Five courses that take you from your first clipper cut to a chair that stays booked — tools, fades, shears, beards, and the business behind it. Short lessons, shown close, explained plain. Watch on your phone, learn at your pace, keep every lesson for life.
5 courses160 lessons26 sectionsLifetime accessCertificate per course3–8 min lessons
One course $129 · All five $297 (bought separately $645 — save $348) · Or 3 payments of $99 · One-time payments, no subscription · 14-day guarantee
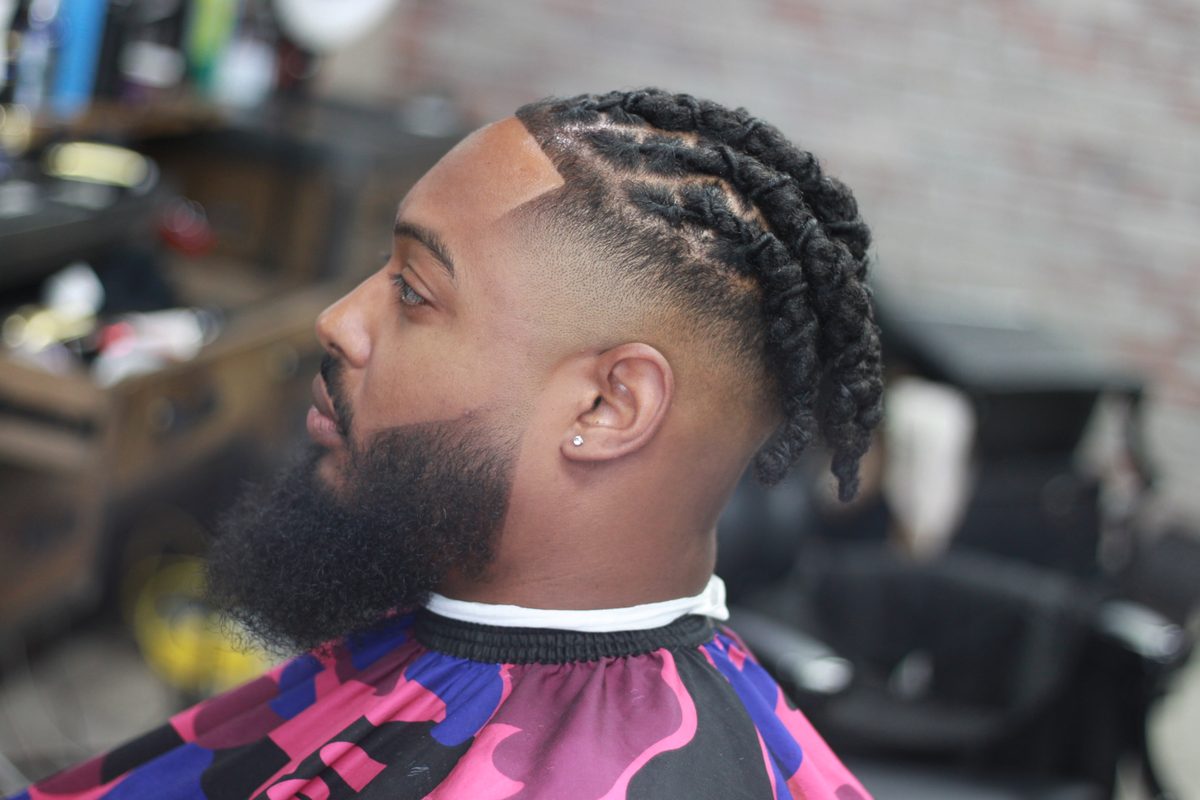
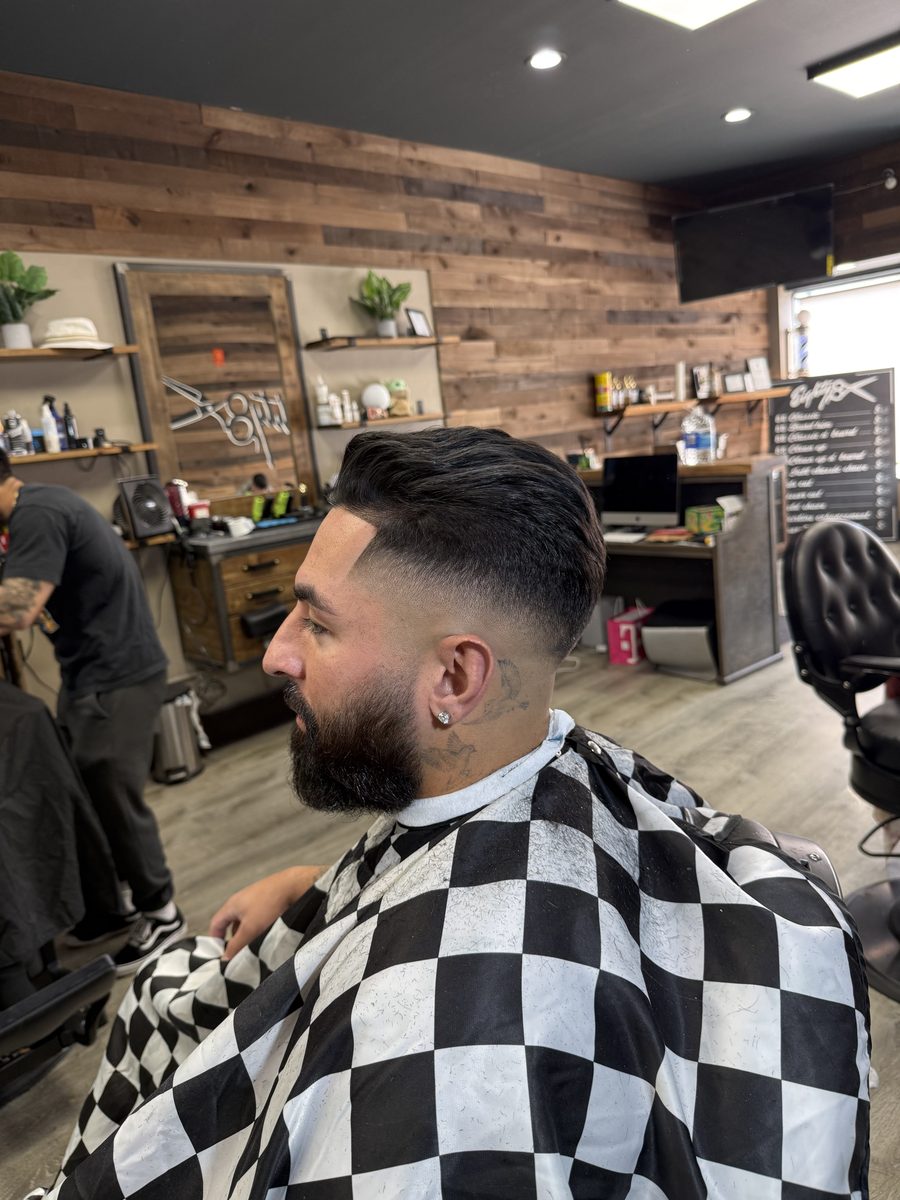
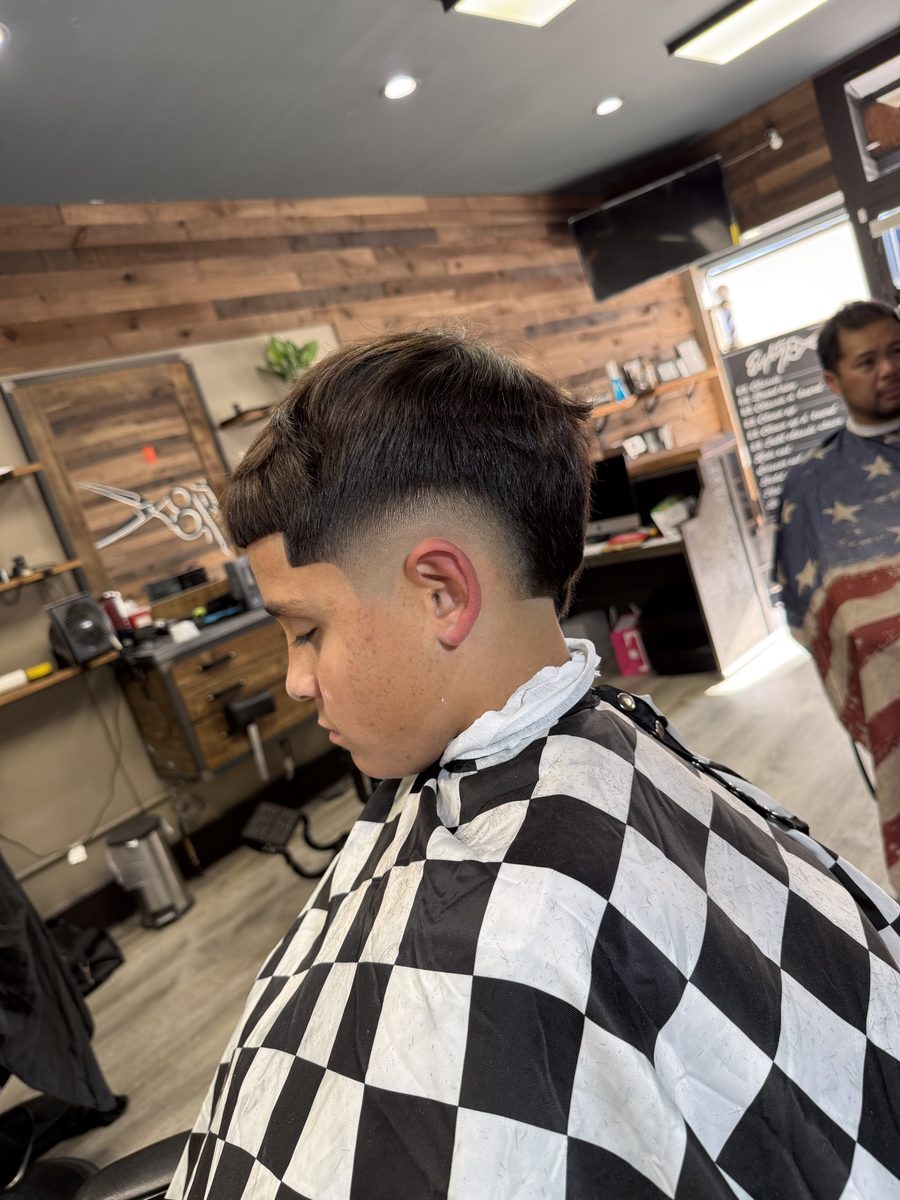
Cut by Barte at 2WENTYTWO — skin fade, twists, and beard work. Taught in Courses 2 and 4.
Founding students: the first 50 students take The Full Course for $297 $197. Enrollment opens when the first courses are filmed — join the list and the founding price is announced to the list first. Joining the list costs nothing.
Who this is for
Built for the barber at the start of the road
Complete beginners. New barbers in their first two years. Barbers who can cut but want cleaner fades. Shop owners training their staff. If that is you, the courses meet you where you are:
You are starting from zero and want to learn in the right order — not from random videos in the wrong order.
You cut friends and family and want those cuts to look like shop cuts.
Your fades are close, but the blend breaks when you look at them in good light.
You are nervous with shears, beards, or a straight razor in your hand.
You want clients who come back, pay what you ask, and send their friends to you.
You run a shop and want every junior trained the same way, to one standard.
It is not for you if you are already fully booked, fully priced, and hunting for a masterclass in one signature cut. This teaches the whole job, start to finish. No experience is needed — Course 1 assumes you have never held a clipper for a real cut.
Meet your teacher
Barte. 15+ years behind the chair.
Barte cuts at 2WENTYTWO in Union, New Jersey. Fades, beard work, and scissor work are his specialties, and for years other barbers have asked him how he does it. These courses are his answer — the whole craft, broken down the way he would show you standing next to his chair.
“It started as a hobby. One of my friends got into cutting hair, I followed in his footsteps, grabbed my dad's clippers, and started cutting. I taught myself most of what I know — watching my bosses over the years, then YouTube when it came out. Just repetition, and remaining a student.”
— Barte, on how he learned the craft
How Barte teaches
Why barbering first — before any technique, you understand why you are doing this.
Proper tools, properly prepared — every haircut starts before the first cut.
Manners — how you treat the person in the chair is part of the craft.
His signature: the three-guard technique — sometimes two guards — taught step by step in Course 1.
Fades
Beard work
Scissor work
Union, NJ
Fade and beard work, finished in his chair — the work of Courses 2 and 4.
How you will learn
Short lessons. One idea each. Practise as you go.
3–8 minutes a lesson
Every lesson teaches one thing — one grip, one guard change, one fix — and runs three to eight minutes. Long videos that teach ten things at once get paused and forgotten. These get finished.
Full cuts, filmed whole
Every full haircut is filmed as one real cut, then split into parts, so you watch the whole job in order and see how each step leads to the next — close up, at the angle you would see it from behind the chair.
Practice in every section
Every section ends with practice you can do straight away. Watch one lesson, practise that one thing, then move on. That is the whole method, repeated until the craft is in your hands.
Filmed in a real shop, on real clients
No studio actors and no scripted models. Barte films at 2WENTYTWO in Union, NJ, cutting the clients who actually sit in his chair — including the conversations, the consultations, and the fixes when a cut does not go to plan.
The practice ladder — every course, same order
Step 1 — Mannequin. Start every new technique on a mannequin head. It costs nothing to get wrong, and you can repeat the same cut ten times in a row.
Step 2 — Free models. Cut real people for free: friends, family, volunteers who know you are learning. Real heads move, talk, and have cowlicks a mannequin never has. Photograph every finished cut so you can see your own progress.
Step 3 — Paying clients. Move a technique to paying clients only when you have done it well on models more than once. Your first paying clients get your best work, not your first attempt — and Course 5 covers how to price it.
The courses
One path, five courses
Each course teaches one part of the job in depth, and each stands on its own. Taken in order, they are the full training: tools first, then fades, then shears, then the details clients pay for, then the business that fills your chair. Every course is filmed at his shop in Union, NJ, on real clients. Tap any course to see every lesson inside it.
Start here — Course 1 of the path
01
Course 1
Barber Foundations
Start here if you are new
$129one-time
Everything before the cut. Most beginners struggle because nobody taught them what the tools do, how a head is shaped, or how hair actually behaves. This course fixes that first, so every cut after it makes sense.
You walk away able to You can set up a clean station, hold and control your clippers with confidence, choose the right guard and lever position without guessing, read any head shape and hair type in front of you — including curly and coily hair — and keep your tools clean, sharp, and working.
From Barte Barte starts this course with why barbering — before any technique. Then proper tools, proper preparation for every haircut, and manners. His signature lives here too: the three-guard technique (sometimes two) that he specialises in and teaches step by step.
The mistake he fixes The mistake he sees most: a first guideline — the bald line — cut with too much space, which makes the whole fade harder than it needs to be.
6 sections · 38 lessons · Lifetime access · Certificate on completion · Watch on phone, tablet, or computer
Section 1 Getting set up: tools and what to buy 6 lessons
What you actually need on day one — and what can wait
Clippers explained: corded, cordless, and what the numbers mean
Trimmers, shavers, and shears: what each one is for
Combs, brushes, spray bottles, and the small tools that matter
How to buy well on a small budget without buying twice
Setting up your station so everything is within reach
Section 2 Holding and controlling your clippers 6 lessons
How to hold a clipper so your hand does not get tired
Wrist movement: letting the wrist do the work, not your whole arm
Pressure and speed: how hard to press and how fast to move
Cutting with the grain, against it, and across it
The scoop-out motion that keeps you from digging in
Practising control on a mannequin before you touch a person
Section 3 Guards, the lever, and length 6 lessons
Guard numbers and the lengths they actually leave
What the lever does and why it matters more than the guard
Lever open, lever closed, and everything in between
Half guards and the lengths most beginners miss
How to check your length before you commit to it
Building a simple length chart you can remember in the chair
Section 4 Reading the head and the hair in front of you 6 lessons
Head shape: bumps, flat spots, crowns, and cowlicks
Why the same cut looks different on different heads
Hair types explained in plain words: straight, wavy, curly, coily
Hair texture and density: fine, thick, coarse, and thin spots
Growth patterns and how hair wants to fall on its own
Asking the right questions before the cape goes on
Section 5 Curly and coily hair, in depth 7 lessons
How curly and coily hair grows, shrinks, and behaves when cut
Why curly hair must be judged dry, not wet
Shrinkage: how much length disappears as curls dry
Cutting curls without creating shelves and steps
Stretch, tension, and when to use less of both
Products and moisture: what helps curls sit right after a cut
Common mistakes on curly and coily hair — and how to avoid them
Section 6 Keeping it clean and keeping your tools working 7 lessons
Sanitation in plain words: what clean really means in a shop
Cleaning and disinfecting between every client
Cleaning your clippers at the end of the day
Oiling blades: how often, how much, and where
Aligning trimmer blades so they cut close without biting
Storing tools, cords, and blades so they last
Knowing when a blade is done and needs replacing
Or take all five in The Full Course for $297. Start here and upgrade later, and the $129 you paid counts toward it — you only pay the difference.
The fade is the cut most clients ask for and the one most beginners struggle with. This course gives you one clear system you can use on every fade, so you stop guessing and start following steps.
You walk away able to You can build a clean low, mid, high, skin fade, or taper from start to finish, blend out your own lines, and fix a mistake in the middle of a cut without panicking or starting over.
From Barte Barte's must-teach list for this course: the different types of fading — high, mid, and low — and the truth that not every head shape is the same. You learn how to read head structure for each client and how to suggest the fade that actually suits them. Consultations are part of the system, not an extra.
5 sections · 32 lessons · Lifetime access · Certificate on completion · Watch on phone, tablet, or computer
Section 1 How a fade is built 8 lessons
What a fade really is: a smooth change from short to long
Guidelines: putting your first line in the right place
Working in order: why the order of steps saves the cut
Building the fade in sections instead of all at once
Checking your work in the mirror as you go
A full fade, start to finish — Part 1: setting the guideline
A full fade, start to finish — Part 2: building the blend
A full fade, start to finish — Part 3: cleaning up and checking
Section 2 Low, mid, and high fades 6 lessons
The low fade: where it sits and who it suits
The mid fade: the most requested fade, step by step
The high fade: keeping it high without taking too much
Choosing the right fade height for the head in your chair
Drop fades and how they follow the head shape
Keeping both sides even when the head is not
Section 3 Skin fades 6 lessons
Taking it down to skin cleanly and safely
Using a shaver and foil without irritation
Blending skin into length with no hard line
Stretching the skin for a closer, cleaner result
A full skin fade, start to finish — Part 1: down to skin
A full skin fade, start to finish — Part 2: the blend up
Section 4 Tapers 5 lessons
What a taper is and how it differs from a fade
The neck taper: clean at the back without a fade
Temple tapers and how they frame the face
Tapering curly and coily hair without pushing the hairline
When a client says taper but means fade — how to ask
Section 5 Blending and fixing mistakes 7 lessons
Finding the line: seeing what is actually still there
Blending with corners of the blade
Clipper-over-comb for the blends guards cannot reach
Fixing a line you took too high
Fixing a dark spot or a patch that will not blend
Fixing an uneven side without making both sides worse
Knowing when the fade is done — and stopping
Or take all five in The Full Course for $297. Start here and upgrade later, and the $129 you paid counts toward it — you only pay the difference.
Clippers get the sides done. Shears are what make the top look right — and what separate a quick cut from a complete one. This course teaches you to build shape on top that connects cleanly to the work below it.
You walk away able to You can section hair with a plan, cut the top to the right length and shape with shears, use shear-over-comb to connect the top to the sides, handle longer and curly tops with confidence, and style and finish the cut so the client leaves looking finished.
5 sections · 30 lessons · Lifetime access · Certificate on completion · Watch on phone, tablet, or computer
Section 1 Sectioning: working with a plan 5 lessons
Why sectioning keeps you from getting lost in longer hair
The basic sections and where each one starts and ends
Clips, partings, and keeping sections clean
Working section by section instead of chasing hair around
Checking balance from side to side as you build
Section 2 Shear work, from the ground up 6 lessons
Choosing shears and holding them without strain
Opening and closing shears the right way
Point cutting and what it does to the ends of the hair
Cutting a straight, clean line with shears
How much to take off — and how to show the client first
Keeping your fingers safe and your cuts even
Section 3 Shear-over-comb 5 lessons
What shear-over-comb is for and when to reach for it
Comb position: the comb decides the length
Moving the comb and shears together in rhythm
Using shear-over-comb to soften a heavy blend
Shear-over-comb on curly hair: working with the curl, not against it
Section 4 Cutting the top 8 lessons
Deciding top length from what the client actually wants
Connecting the top to the sides without a shelf
Cutting the top on straight and wavy hair
Cutting the top on curly and coily hair, dry and by curl
Fringe and front: getting the front right without taking too much
Longer tops and scissor cuts for clients who do not want clippers on top
A full scissor cut, start to finish — Part 1: sides and structure
A full scissor cut, start to finish — Part 2: the top and the finish
Section 5 Styling and finishing 6 lessons
Blow-drying with direction: making hair sit where you cut it to sit
Choosing product by hair type: matte, shine, hold, and moisture
How much product to use — less than you think
Styling curly and coily hair without drying it out
Showing the client how to do it at home in thirty seconds
The final check: mirror, neckline, and stray hairs
Or take all five in The Full Course for $297. Start here and upgrade later, and the $129 you paid counts toward it — you only pay the difference.
Clients judge a cut by its edges. This is the course on the work people photograph — sharp lineups, beards shaped to the face, and clean razor work done safely every time.
You walk away able to You can give a client a crisp, natural-looking lineup without pushing it back, shape and care for any beard by face shape and growth pattern, and use a razor with confidence and good safety habits from the first client to the last.
4 sections · 26 lessons · Lifetime access · Certificate on completion · Watch on phone, tablet, or computer
Section 1 Lineups that look sharp and stay natural 6 lessons
What a lineup is for: cleaning the frame, not redrawing it
Lining the front hairline without pushing it back
Temples, corners, and keeping both sides matched
Lining the back and around the ears
Lineups on curly and coily hairlines
When to leave a hairline alone — and how to explain why
Section 2 Beard shaping and care 7 lessons
Reading a beard: growth pattern, patchy spots, and direction
Shaping a beard to the face in front of you
Cheek lines and neck lines that look natural
Trimming length without losing fullness
Beards with curly and coarse growth: detangling and shaping
Beard products and simple care you can pass on to the client
A full beard service, start to finish
Section 3 Razor work and safety 7 lessons
Razor types and how to handle each one safely
Preparing skin: warmth, product, and stretch
Razor angles and short, controlled strokes
Cleaning up edges and the neck with a razor
Blade changes, disposal, and hygiene every single time
Nicks, irritation, and sensitive skin: prevention and care
Knowing when not to use a razor on a client
Section 4 The finishing touches clients notice 6 lessons
The neckline: squared, rounded, or tapered — and how to choose
Cleaning up around ears, sideburns, and the collar
Eyebrows and stray hairs: small work, big difference
The hot towel and the small comforts clients remember
Dusting off, checking in daylight, and the final mirror turn
Asking for the photo: how finished work becomes your advert
Or take all five in The Full Course for $297. Start here and upgrade later, and the $129 you paid counts toward it — you only pay the difference.
Skill fills a chair once. This fills it every week
$129one-time
Good cutting gets you a first client. Everything in this course is what gets you the second, the tenth, and a chair that stays full — how you talk, how you price, how you treat people, and how you show your work.
You walk away able to You can run a calm, clear consultation, set prices you can explain without apologising, turn first-time clients into regulars who rebook before they leave, handle problems like a professional, and take photos and videos — and post on Instagram and TikTok — in a way that steadily brings in new clients.
6 sections · 34 lessons · Lifetime access · Certificate on completion · Watch on phone, tablet, or computer
Section 1 The consultation: getting it right before you cut 5 lessons
The five questions to ask before any cut
Looking at photos with a client and agreeing on the same cut
Saying honestly when a style will not suit a head or hair type
Agreeing on length, price, and time before you start
Checking in during the cut without slowing yourself down
Section 2 Pricing your work 6 lessons
How barbers price: by time, by service, and by skill
Setting your first prices without racing to the bottom
Raising prices as you get better — and telling clients well
Pricing add-ons: beard work, designs, and extra detail
Deposits, no-shows, and late clients: simple, fair rules
Taking payment cleanly and keeping simple records
Section 3 Building a clientele 6 lessons
Where first clients actually come from
Turning a walk-in into a regular
Referrals: making it easy for happy clients to send people
Working in a shop: booth rent, commission, and what to ask first
Staying booked in slow weeks without discounting everything
Keeping client notes so you remember their cut and their life
Section 4 Service and rebooking 6 lessons
The small habits that make a client feel looked after
Rebooking before the client leaves the chair
Reminders that help clients and do not annoy them
Handling a client who does not like the cut
Handling complaints, lateness, and awkward moments calmly
Knowing when to let a difficult client go
Section 5 Photos and video that sell your work 5 lessons
Lighting a finished cut with just your phone
Angles that show a fade honestly and well
Before-and-after photos clients are happy to share
Filming a short cut video without slowing the service down
Asking permission and tagging clients the right way
Section 6 Instagram and TikTok 6 lessons
Setting up a profile that tells a client where and how to book
What to post: finished cuts, process, and a little of you
Posting steadily without it eating your day
Captions and hashtags in plain words that clients actually search
Turning viewers into bookings: the link, the reply, the call to book
Reading what works and doing more of it
Or take all five in The Full Course for $297. Start here and upgrade later, and the $129 you paid counts toward it — you only pay the difference.
You save $348. Or split it: 3 payments of $99 — the same $297 total.
Lifetime accessCertificate per coursePractice ladder in every section14-day guarantee
All five courses, in order, for one payment — less than half the price of buying them separately. You save $348. For scale: one full day of in-person training costs more than twice this, and it ends when the day ends. The Full Course is yours for life, and you can rewatch any lesson the night before a cut.
One-time payment. No subscription, nothing renews. Lifetime access, including lessons added later.
Add-on · $499 one-time
The Mentorship — your cuts, reviewed by Barte
Courses teach you the craft. Mentorship corrects your hands while you learn it. Add this to any single course or to The Full Course and, for four weeks, your real cuts get reviewed one-to-one by Barte himself. It is for students in the courses who are cutting real heads and want their work corrected while it still counts.
Week 1 — Send in a full cut. You get a detailed review of your technique, the main things to fix first, and clear goals for the week.
Week 2 — Send in your next cuts, including the Week 1 fixes. Corrections on what improved, what is still off, and where to focus next.
Week 3 — Speed and consistency: the same clean cut, on different heads, without your time creeping up.
Week 4 — Final cut evaluation: where you started, where you are now, and a plain plan for what to practise next on your own.
Four weekly one-to-one review sessions
Detailed, personal corrections on your real haircuts
Business and clientele guidance as your cuts get ready to sell
Content guidance for the work you are producing
Answers to your questions between sessions
How the reviews work
You send your cuts. Each week you send in the cuts you have done — photos and video, the work as it really looks.
Barte reviews them himself. Technique, blending, detail, and finish — what is working and what is not, said plainly.
You get your corrections. Personal notes and one clear focus for the next week, so every week builds on the last.
Four weeks for $499 one-time — works out to about $125 a week. Not a subscription.
His work
Real cuts from his chair
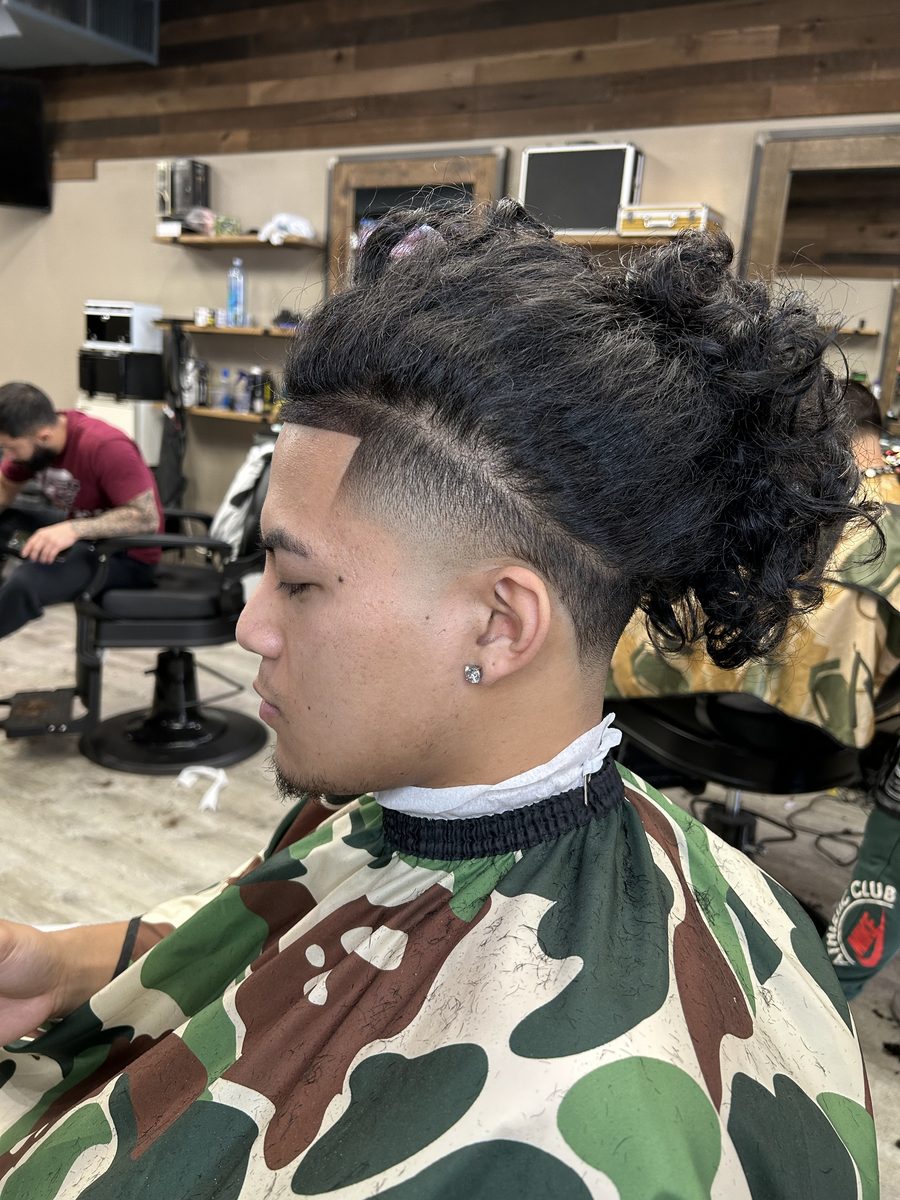
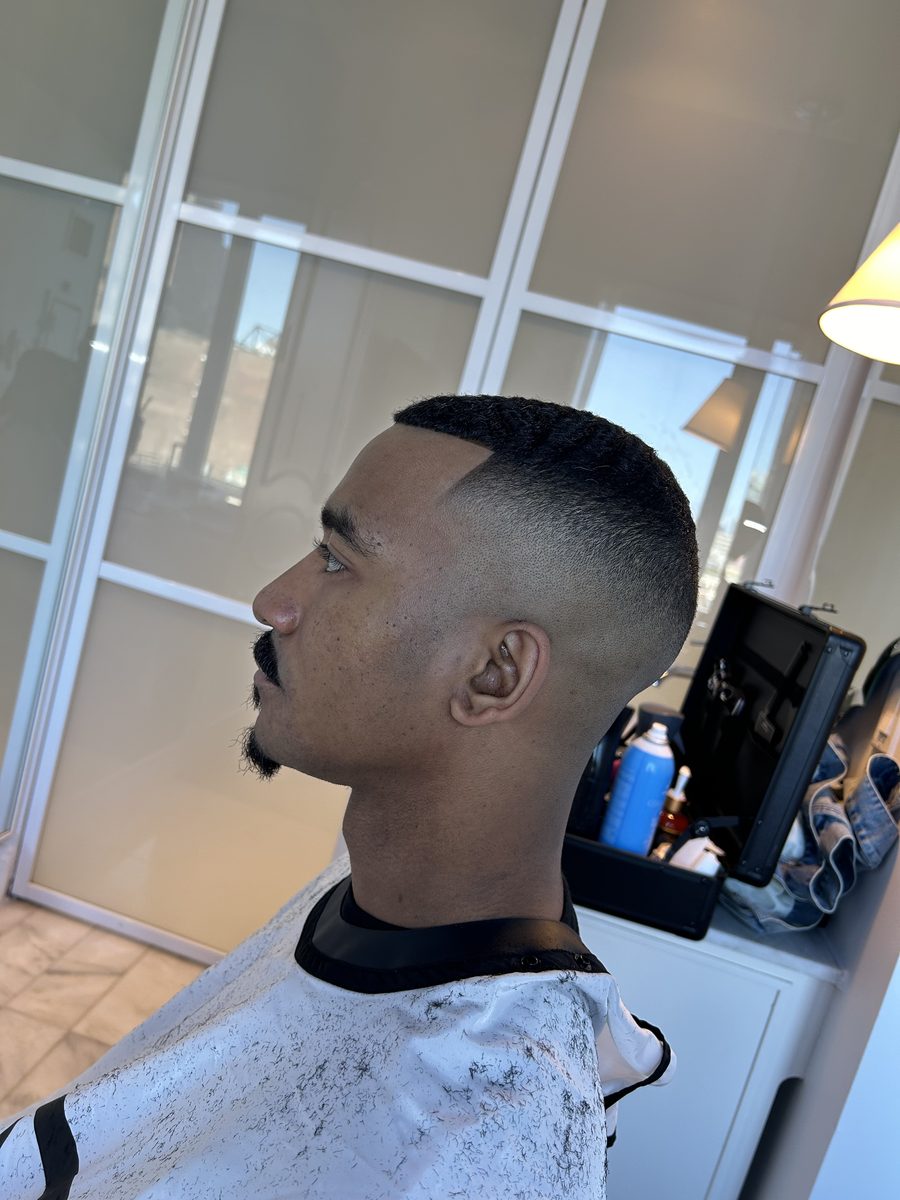
No stock photos. This is Barte's own work, on his own clients — the standard the courses teach to.
High fade, long curly top — Course 2High skin fade — Course 2Mid fade, textured top — Course 2
The guarantee
14 days. The risk sits with us.
Start the courses. Watch them, practise with them, put them to work.
14 days from purchase to decide.
Watched less than 25% of the course? The guarantee covers you.
It applies to every single course and to The Full Course. No long form, no hard sell on the way out. What we ask is that you actually start: the barbers who work the first course in order are the ones whose cuts change.
How it works
From sign-up to certificate
Pick your start. One course for $129, or The Full Course for $297. When enrollment opens, you pay once, online — no subscription, nothing renews.
Watch on your phone. Lessons play on phone, tablet, or computer — in the shop, at home, or on the way to a cut.
Learn at your pace. Watch in order, or jump to the fade, beard, or pricing lesson you need that day. Rewatch as often as you want.
Practise on the ladder. Mannequin first, then models, then paying clients — the way the courses teach it.
Finish, get your certificate. Complete a course and the certificate is yours. Finish all five and you hold five — one for each part of the trade.
Please read — skill and licensing. These courses teach the skill of barbering: how to cut, blend, shape, and serve clients well. They do not replace a state barber licence, and they do not grant one. In most states you need a licence from that state to charge for barbering in a shop. Check what your state requires, and treat this training as the skill you bring to that licence — many students take it before, during, or alongside barber school to get ahead of the work itself.
Questions
Before you ask
The questions every student asks, answered straight. Can't find yours? Email real2wentytwo@gmail.com and ask — a person reads it.
No. Barber Foundations starts from zero — tools, grip, guards, and head shape come before any fade. If you already cut, start with the course that matches the part you want to fix, or take The Full Course and move quickly through what you know.
The courses are being filmed now, at Barte's shop — Barber Foundations and The Fade System first. Enrollment opens as soon as they are ready, and the founding price ($197 for The Full Course, first 50 students) goes to the list first. Join the list on this page and you will hear before anyone else.
Only Course 1 starts at zero — and even experienced barbers find habits in it worth fixing. If your fades, shear work, beards, or bookings are the weak part, start with the course that matches the gap. The Full Course lets you move quickly through what you already know and slow down where you do not.
That is up to you — there are no deadlines and your access never expires. The 160 lessons run three to eight minutes each, so the full path is somewhere between a focused weekend of watching and a steady few weeks of watching and practising. The practice matters more than the pace: one lesson, practised, beats ten lessons watched.
Yes. Start with any course for $129, and if you later take The Full Course, what you already paid counts toward it — upgrading from one course means paying the difference, $168, not the full $297 again.
When enrollment opens, the first 50 students get The Full Course — all five courses — for $197 instead of $297. It is the same courses, same lifetime access, same certificates. It is Barte's way of thanking the students who trust the courses early. Join the list to be in the first group told.
Yes — The Full Course can be split into 3 payments of $99, the same $297 total. Single courses and the Mentorship are one payment each. Payment happens when enrollment opens; today there is nothing to pay, only the list to join.
Use the guarantee. You have 14 days from purchase. If you have watched less than 25% of the course and decide it is not right for you, email us and you get a full refund.
For life. Buy once and it stays yours — no expiry, no renewal, no subscription. That includes any lessons added to a course after you buy it.
Less than you think. Barber Foundations opens with the full list — what you need first, what each tool is for, and what can wait until you are earning. A basic clipper, a trimmer, shears, combs, and a mannequin head for practice carry you through the early courses.
No. These courses teach the skill of barbering — cutting, fading, shear work, beards, and running a chair. They do not replace a state barber licence and they are not a licensing programme. In most states you need a licence from an approved barber school and a state exam to charge the public as a licensed barber. Learn the craft here; check your own state's requirements for the licence itself.
Finish a course and you receive a certificate for that course. There are five courses, so The Full Course holds five — one each for Foundations, The Fade System, Shears & Structure, Details & Beards, and Booked & Paid.
Yes — shop owners training staff are exactly who the full path was built to standardise. Email real2wentytwo@gmail.com and we will set it up so each of your barbers has their own access and their own certificates.
Not yet — the courses are in English for now. If that changes, the list hears about it first.
Be first in line when enrollment opens.
Pick the one part of your cutting you want to fix, or take The Full Course and learn the whole trade in order. Join the list now and the founding price — $197 for the first 50 students — is announced to you first.
Enrollment is not open yet — the courses are being filmed now, starting with Barber Foundations and The Fade System. There is no checkout and nothing to pay today.
Join the list and you will be the first to know when enrollment opens — including the founding price: The Full Course for $197 for the first 50 students.